

Make a Sprite Move and Turn with Arrow Keys
In this lab project you will make your sprite move forward and turn using the right and left arrow keys.
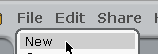
1. |
File... New to start a new Scratch Project. |
 |
2. |
Right click on the cat sprite and delete it. |
|
3. |
Click the New Sprite button and pick a new sprite. I'll choose a bee from the Animals folder. |
|
4. |
Now drag Move Block from the Motion group. |
|
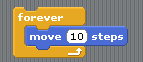
5. |
We want our sprite to move all the time, so let's put the move block in a forever block. This means it will keep moving 10 steps at a time until we click the red stop all sign. |
 |
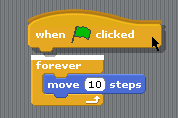
6. |
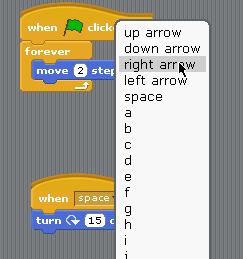
It would be nice if we could just click the green flag to get our sprite to start moving. To do this we use the Green Flag control block. Add it to the top of the forever block by dragging it until the pieces lock together (you'll see the white line). |
 |
7. |
Now click the green flag. The sprite should move to the edge of the stage. If you pull it back on with your mouse, it will just keep moving off again. It would be nice to be able to turn it left and right, wouldn't it? |
|
8. |
Lets add a turn block from the Motion section. |
|
9. |
Click the green arrow to start your sprite moving and then try clicking on the TURN BLOCK to control it. It is hard, isn't it? The sprite moves too fast! How can we slow it down? |
|
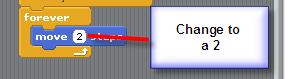
10. |
We can slow it down by making it move less steps everytime we do a forever loop. If we move less steps on each forever loop the sprite will move slower. Change from 10 steps to 2 in your move block inside the forever block. |
 |
11. |
Now click the green flag again and click the turn block to control it. Is it easier? |
|
12. |
It would be nice if we could use the arrow keys to turn our sprite as it moves on the screen, wouldn't it? We can do that by dragging a KEY PRESS TOP BLOCK from the Controls section and add it the TURN RIGHT block. |
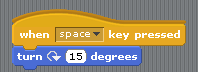 |
13. |
Now click the little arrowhead next to space and select RIGHT ARROW from the list that pops up. |
 |
14. |
Now click the GREEN FLAG above the stage to start your program. When you press the right arrow key the sprite should turn right 15 degrees. Does it? If not, stop and review the directions and fix it. |
|
15. |
Now we need to add another section to turn left when press the left arrow key. See if you can add it! HINT: Look at the TURN RIGHT block and just change the turn direction and the key you press. |
|
When you complete this project, SAVE IT!! Then show your project to Mr. Biggs so he can check it off for your grade! |
||